I no longer use the "sportmurphy.com" email listed elsewhere online. try myspace/facebook if you have something to say or ask.
Friday, November 09, 2007
SPORT SPIEL©®™
PRESENTS
HI! TODAY WE LEARN ABOUT PHOTO EDITING FOR TO MAKE WITH SUPER SNAZZY EFFECTS OF ARTISTIC SORT.
Remember ol' J Flood? How could you forget? How do I make it to look like it was really really me with actor Morgan Freeman? Tricks of the trade! I'm not greedy! I will help you do this too!
You're welcome.
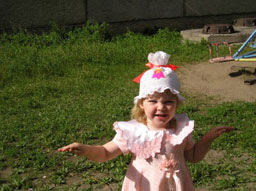
 Let's first begin with seeing this great picture of a little girl. She is cute as all get-out, yet is presented in a very unappealing setting. In poorly composed frame, to boot! Yuch!! Such a shame!
Don't worry. We fix.
Part 1: CHOOSING THE BACKGROUND IMAGE TO DO THIS WITH
PRESENTS
HI! TODAY WE LEARN ABOUT PHOTO EDITING FOR TO MAKE WITH SUPER SNAZZY EFFECTS OF ARTISTIC SORT.
Remember ol' J Flood? How could you forget? How do I make it to look like it was really really me with actor Morgan Freeman? Tricks of the trade! I'm not greedy! I will help you do this too!
You're welcome.
 Let's first begin with seeing this great picture of a little girl. She is cute as all get-out, yet is presented in a very unappealing setting. In poorly composed frame, to boot! Yuch!! Such a shame!
Don't worry. We fix.
Part 1: CHOOSING THE BACKGROUND IMAGE TO DO THIS WITH

First let's choose an image from the infinite choices of great Art. Hooray, here's a corker! Mermaids on seacoast, greeting a big wave full of unicorns. It's beauty itself, and evocative of many wonderful dreams.
Why did I choose this? No, not me. It was there on the page from which I took this whole interesting series of "how-to"!!! Maybe I would pick a girl I personally know, and maybe an artwork I like a lot, like "Praying Hands" or "Guernica" but this one is lovely anyway.
OK hold on tight because now the fun really starts. Use "selectopic" function parameter to isolate wanted picture part... in our case, the cute as a button girl.

See the dots around her. This is the sign of great potential success in that the selected part is the girl the whole girl and nothing but the girl.
This can be tricky, but don't worry. With practice, you can master the technique and not have what they call the "artifacts"stuck on her like bad growths, and in this way ensure perfect "contour enclosure" of the girl - or, of course, your own preferred image-part in your own project! Remember, have FUN with this! We are only giving examples for your practice. In the future your only limits are the limits of your own imagination!
Now is when fun really sets in for real. Because now you "drag and drop" your carefully selected girl-image into the Art. No, we're not "there" yet, but it is beginning to come to life!!
 LOOK! You can move her around and pick the perfect position for your "inset" image, in this case that cute girl. I forgot to tell you about the different parts in headlines the way I started, but we're very well into it now, so it's no use going back and fixing it. But I'll make sure to remember from now on.
Notice though that now it looks very "amateurish" like you just stuck her there, boom.
In the olden times this was "good enough" but that's not even how it is no more.
You want to make things get better and now you can, so why not? NO reason!
PART 5: MAKING THINGS GET BETTER AS YOU DO THIS THING.

Use "Transparadjust" knobs on your console to bring the cute as a bug in rug girl in and out of transparency visual contrast to set a "natural" value-tone to the new combination YOU are creating.
Remember the color harmonization tutorial and adhere to suggestions of complementary realism. Never forget, this is where the magic happens!
Don't get lazy... we are almost "home!"
NOW is when fun absolutely overtakes everything like a huge blanket of joy. You are sweating a little, maybe. This is no coincidence. That's how you should feel, always, but surely now, as you
 "zero in" on the desired effect. Carefully manipulate the "detail contiguity tool." Make sure the relative transparency/opacity contact points jibe with all desired rightness.
In our example, unicorn horns should maintain a solidity and suggestion of physical mass foregrounding our cuter than anything girl, keeping the majesty of their crashing-wave approach fully in mind.
But recall that she needs to be more solid in front of things like background horizon and night sky! If not, why not? Go for it! This is the important part, but also the most fun and rewarding!
Now is when the fun becomes...
Oh wait... headlines... plus,
I meant to headline the previous step:
PART 6: HOW TO ZERO IN ON DESIRED EFFECT
This one coming up now is:
PART 7: SETTING YOUR NEW PHOTO COLLAGE INTO PERMANENCY!
Now is when the fun becomes so super magnificent that I dare you to breathe. You will have arrived at the perfect realization of your efforts
 . Don't cry, it's OK. but you must act quickly and decisively before the moment passes and the "auto delete" function engages. This can happen in as little as 3 seconds under ordinary conditions.
Go! Go NOW for GOD'S SAKE! Hit SAVE before the whole wonderful effort disappears forever!
Phew! You did it! Give yourself a round of applause! Just LOOK at that!
You made her into an oh so cute Goddess of the Sea, riding into the shore like a vengeful, cute Goddess of the Sea, and it looks like she was meant to be there all along! Now you can PRINT the picture and frame it. Or send it to loved ones. Or post it on your website as a "Website Picture." It will look nice in "TILE" format as the backdrop on your MySpace page. Your "friends" and "family" will post comment after comment, on the order of "Wow! How did you do it?" You can "reply to poster" with coy remarks. Like:
"OH... a friend of mine helped me out in this endeavor."
Yes, a little friend named...
SPORT SPIEL©®™
come to sport spiel daily for craft tips, scrapbooking ideas and a veritable cornucopia of all that is the best, always.
"We think lots of things matter: even you."
Yes, a little friend named...
SPORT SPIEL©®™
come to sport spiel daily for craft tips, scrapbooking ideas and a veritable cornucopia of all that is the best, always.
"We think lots of things matter: even you."
Comments:
Post a Comment